Online safety best practices for tuition through Zoom
Children’s safety is at the core of Equal Education’s considerations in the work we do. We have thoroughly investigated concerns over Zoom’s security and have concluded that the service is safe to continue with when used optimally.
We will continue to monitor the ongoing status of all softwares used by the company in accordance with our Safeguarding and GDPR policies. We will also continue to promote and share online safety best practices with our full network of tutors.
Please ensure you are following these online safety best practices to stay safe and protect students during online tuition:
1) Keep Zoom and all other software up to date: Zoom has recently released a new safety specific update to protect its users, please update your version here as soon as possible. As a matter of general online safety, make sure you update all software you use regularly, as developers are always improving security and combating new hacking attempts.
2) Always use passwords for the meetings: Passwords should now be default for all accounts, but just in case, please make sure that your settings have passwords enabled. When possible try to use the randomly generated passwords provided by Zoom, as they are harder to guess. Check your password settings here.
3) Only share details through secure channels: please only send details of the meeting to the parent/carer’s email account.
4) Use virtual waiting rooms: Use this feature to hold potential participants in a separate ’waiting room’, so you can check who they are before allowing them entry. Enable this feature in Settings > In meeting advanced settings here.

5) Lock your session: If your session has started with you and the student, you can lock your session, so that no one else can join - even if they have the link and password. Do so by clicking the security tab on the bottom bar, and selecting ‘Lock Meeting’.

6) Allow only signed-in users to join: If someone tries to join your event and isn’t logged into Zoom with their email they will be rejected from the meeting. This is protection from potential intruders from entering the meeting room without first being screened by Zoom. Change your settings by:
Going to Account Settings. Under Schedule Meeting, verify that “Only authenticated users can join meetings” is enabled.
If the setting is disabled, click the toggle to enable it. If a verification dialog displays, click Turn On to verify the change.

7) Remove unwanted or disruptive participants: From the participants menu, you can hover over a person's name, and several options will appear – including "remove”.
8) Limit screen sharing: Make sure your student doesn’t take control of the screen and prevent them from sharing random content by limiting screen sharing, so only you as the tutor (host) can present. This can be done through the security tab in call as seen above, or through the settings menu, settings > in meeting basic here

9) Disable private messaging: If you are conducting a group session and want to prevent distractions among your students, you can do so by stopping private messaging between them.
1) Start a meeting or webinar as host.
2) Click Chat in the Meeting Controls.
3) At the bottom of the in-meeting Zoom Group Chat window, click More, and then choose an option for Allow attendees to chat with.
4) For meetings, the host can allow attendees to chat with everyone or with the host only.
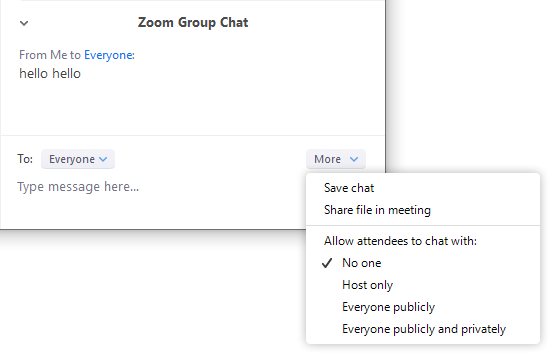
5) For webinars, the host can allow attendees to chat with no one, with all panelists (including host), or with all panelists and attendees.

10) End the meeting for all: When the tuition session is done, always select “End meeting for all”, otherwise the student(s) can remain in the call, whereas this way the meeting room is closed and the student(s) are always supervised by an adult on the platform.